Here is yet another story for "the power of open source."
I've been spending quite a bit of time working on SLAM with the Neato XV-11 using both the built in laser and the Hokuyo URG-04LX-UG01. I had pretty much given up on gmapping working with the Neato -- until earlier today we found an issue with the scan angle increment computation in gmapping not working with the Neato laser specifications. I probably wouldn't have found this bug had it not been for a user of the Trossen Robotic Community pointing out some issues he was having with gmapping, as my version still had some modifications from my PML work earlier this year.
Anyways, for anyone wanting to use gmapping with the Neato robot, you can apply the following patch:
339c339
- gsp_laser_angle_increment_ = (angle_max - angle_min)/scan.ranges.size();
+ gsp_laser_angle_increment_ = scan.angle_increment;
to slam_gmapping.cpp. This uses the angle_increment from the laser scan, rather than the computed one, which is incorrect for full rotation scans. This will avoid issues with the scan being improperly inverted, and issues with scan matching.
-Fergs
Friday, December 31, 2010
Other SLAM Algorithms: CoreSLAM, Part 3
I've now got the build system working as well as fixing a number of parameter issues to be more ROS-compliant. Documentation for the package has been uploaded to http://www.ros.org/wiki/coreslam
Here's another example map created (of the first floor of a home):

Next up on the docket of winter break projects: some updates to the ArbotiX ROS package, and a number of people perception algorithms.
-Fergs
Here's another example map created (of the first floor of a home):

Next up on the docket of winter break projects: some updates to the ArbotiX ROS package, and a number of people perception algorithms.
-Fergs
Saturday, December 25, 2010
Other SLAM Algorithms: CoreSLAM, Part 2
I've now get the Monte Carlo Localization turned on, map publishing working in ROS, and a number of parameters defined. This required some hacking of the CoreSLAM library, in particular I removed all of the references to differential drive odometry, instead loading odometry externally from TF.
Here's an updated map using the 12-12-neato-ils bag file:
There's still some work to fix the way that the map->odom transform is handled, and allow a configurable map size and resolution (both of which will require reworking some more of the underlying library). I'm hoping to have the code released shortly.
-Fergs
Here's an updated map using the 12-12-neato-ils bag file:

There's still some work to fix the way that the map->odom transform is handled, and allow a configurable map size and resolution (both of which will require reworking some more of the underlying library). I'm hoping to have the code released shortly.
-Fergs
Friday, December 24, 2010
SLAM Data Sets
Over the past semester I've been spending a lot of time working with low-cost SLAM. In doing so, I've collected a number of datasets around the Albany campus. I've uploaded a number of them (as ROS bag files), along with sample maps, to my server: http://www.fergy.me/slam. All are free to use these datasets for whatever they please -- however, please post back maps and algorithms/parameters used to create them. Over time I would like to develop a set of best-known algorithms/parameters for low-cost SLAM.
These datasets were collected on iRobot Creates, the Neato XV-11, and the Vanadium Armadillo using the Neato Laser or the Hokuyo URG-04LX-UG01. In particular, I've recently collected a dataset I really am looking forward to working with: the 2010-12-23-double-laser.bag dataset, which consists of a long route around the ILS lab with a Neato XV-11. I mounted a second laser on the Neato for this run, a Hokuyo URG-04LX-UG01 sensor, which is aligned with the Neato laser from above:

And a picture of the Neato with second laser:

-Fergs
Thursday, December 23, 2010
Other SLAM Algorithms: CoreSLAM
gmapping is the map building (SLAM) software most commonly used in ROS. It works very well if you have a very high quality and long-range laser. The Neato laser is neither high quality nor long range (and the low-cost Hokuyos, while fairly accurate, are still near-sighted). There isn't a lot of academic literature that mentions low-cost lidars (unless it's a paper about building a low cost module).
One paper recently published that actually uses a short range Hokuyo is CoreSLAM, a SLAM implementation in under 200 lines of code. Well..., the map update/storage aspects are less than 200 lines of C code, however the complete system relies on a bit more, namely a particle filter for localization.
It looked good. So I integrated it into ROS:

This map is currently only using odometry, I'm going to try and get the MCL localization aspects working more tomorrow. I also need to get the map_saver to work with my ROS wrapper. I hope to have this on our SVN by the weekend.
-Fergs
One paper recently published that actually uses a short range Hokuyo is CoreSLAM, a SLAM implementation in under 200 lines of code. Well..., the map update/storage aspects are less than 200 lines of C code, however the complete system relies on a bit more, namely a particle filter for localization.
It looked good. So I integrated it into ROS:
This map is currently only using odometry, I'm going to try and get the MCL localization aspects working more tomorrow. I also need to get the map_saver to work with my ROS wrapper. I hope to have this on our SVN by the weekend.
-Fergs
Tuesday, December 14, 2010
Neato+ROS: Now With SLAM!
Here we go: I've got the Navigation stack working on a Neato XV-11
Code is now online in the ILS Social Robotics Lab (SUNY Albany) Repository.
-Fergs
Code is now online in the ILS Social Robotics Lab (SUNY Albany) Repository.
-Fergs
Sunday, December 12, 2010
Neato+ROS
It's no secret that I'm a big fan of low-cost sensory. In fact, I'm a bit obsessed with it. And lately, we've been in cheap-sensor overload. Last month I picked up a Kinect, although I haven't had a ton of time to play with it yet. Luckily it looks as though the OpenNI+ROS drivers will be in good shape by the end of the week -- when our semester ends and I'll have a bit more free time.
On the subject of ROS, I'm also a big fan of that. Which brings us to the true reason for this post: I picked up a Neato XV-11 robotic vacuum this week (Thursday) and it arrived Friday (Amazon Prime $3.99 next-day shipping FTW). Friday night I spent about 4 hours getting the laser scanner and motor basics lined up, and then drove it around for a little while to discover numerous bugs. This afternoon I worked out most of the bugs, although I still need to work on the odometry calculations a bit more. Anyways, here's a quick video:
A couple of thanks to send out -- had it not been for this blog post by Hash79 of the Trossen Robotics Community, I probably wouldn't have even bought a Neato -- but all that data! The Neato looks like it could be a very interesting competitor for the iRobot Create -- hopefully I can get the odometry/laser data to work in gmapping (so far, I've had *no* luck).
More tomorrow -- as well as a code release (after cleaning things up).
-Fergs
Monday, November 1, 2010
The Armadillo Goes Mapping
 Several weeks ago I built a new, small robot platform that could be used as a testbed for the ArbotiX-ROS bindings. That robot is the Armadillo. The Armadillo has a differential drive base with a pretty decent payload,
a FitPC2 brain, and a 4DOF arm. He's also sporting a Hokuyo URG-04LX-UG01 laser range finder.
The poor Armadillo was sitting around for quite a while until I upgraded his motor drivers to handle the extra weight of the platform. However, he's now fully operational. To test out whether his odometry would be good enough to work with the ROS navigation stack, he was driven around to build a series of maps.
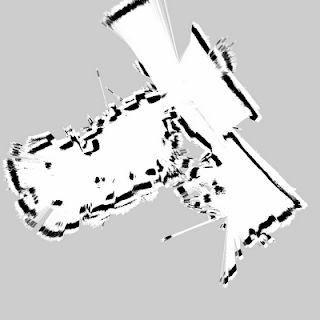
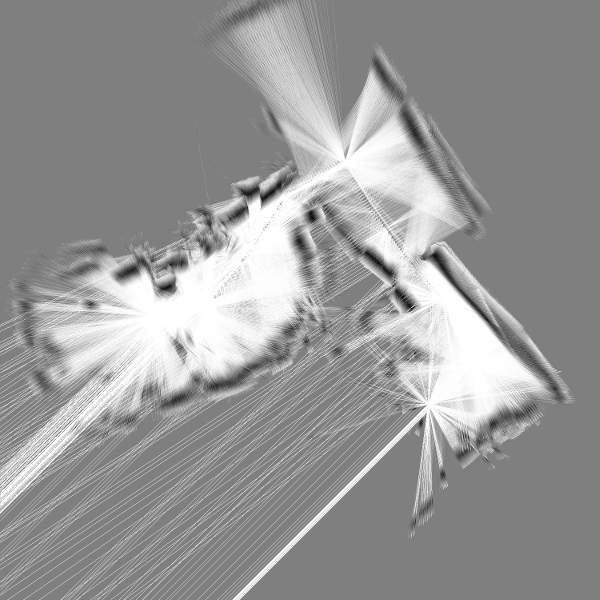
The first map is of the first floor of my house. The Ar
 madillo started in the living room, when down the hallway and into the kitchen, and then returned. The map came out pretty good, I plan to collect a map of the complete house later this week.
A second, much larger map was made of the CS department hallways. This one had some issues. In particular the scan matching was creating false positives, which "shortened" the hallways. I'm still hopeful this can be made to work though, with a bit more parameter tweaking. Below, the image on the left is the map from gmapping, and the image on the right is a raw odometry-based costmap in RViz:
I'm going to try and keep this blog a bit more up to date from now on.... we'll see if it actually happens.

-Fergs
Monday, August 9, 2010
ROS and Other Ramblings
 I've been a bit ineffective at finishing things lately, and thus haven't had much to say in this blog. Issy got a new laser cut body, some teaser pictures are over at TRC, but I haven't gotten back to software development on him yet.
I've been a bit distracted playing around with navigation and motion control under ROS. During July I built a "Poor Man's LIDAR" (or PML for short), out of a long range IR sensor and an AX-12. The image to the left shows the PML mounted on ROSalyn, an iRobot Create based ROS-powered robot I've recently assembled at the University lab. I'm using a new ArbotiX-derivative board to control an AX-12 pan and tilt and the PML.
I actually bought the sensor about 18 months ago -- originally to put on REX (may he rest in pieces), but hadn't gotten around to actually hooking it up until recently (partially inspired by the successes that Bob Mottram had). All in all, it works fairly well -- way better results than I ever had with a sonar ring, but of course nowhere near a true LIDAR. The PML results are broadcast within ROS as if they were actually produced by a laser scanner. You can see the scan (black dots) and then a costmap_2d generation (red dots are lethal objects, blue dots are expa
 nded version for motion planning) showing up in the RVIZ view (the robot is at the end of our hallway, the range of the costmap is 3m, less than the 5 or so meters that the laser can trace out, so there's no costmap generation of the walls inside the rooms in the distance, just the laser scan dots).
All of this ROS work is towards the goal of producing a very robust, and extensive ROS package for the ArbotiX. The core of the package allows the ArbotiX to control AX-12 servos, read/write digital IO, and read analog inputs -- all within ROS. There's also extensions to control differential drive robots, or NUKE-powered walkers, using the standard "cmd_vel" topic -- and publish odometry such that the bots could be tied into the ROS navigation stack. Version 0.1 is now in SVN, although the ROS API is quite unstable and will be changing drastically in 0.2 (to a much nicer, and more robust interface, which also sets up several features I want to implement further down the line).
-Fergs
Friday, June 25, 2010
Arduino Common Knowledge, Part 1 of N: LEDs Without Resistors
Some time ago I read a book called "C++ Common Knowledge". It consisted of a series of short 2-3 page articles, each detailing some important, but often misunderstood detail of C++. Recently, I've answered a number of Arduino/Electronics questions that seem to have this same feeling to them. This is the first in a series of short articles I'm going to call "Arduino Common Knowledge".
Today, we'll start with an idea that seems to go against all safety warnings: you can blink an LED directly off an Arduino/AVR pin. Yep, no resistors. We've probably all experienced the fun of plugging an LED in between our 5V and ground rails, and watching it glow brightly for a second before exploding and smelling quite awful -- so it seems natural we'd always want to install a current-limiting resistor to stop this problem.
But here's the interesting part: your Arduino/AVR is a current-limiting device. The I/O pins can typically only source about 15-20mA of current. Thus, if we connect our LED between the pin and ground, and toggle the pin high, our LED glows nicely without exploding.
There are a few caveats to this though: you can't do this on every pin on the AVR at the same time, or even a large number of pins. The ATMEGA168 data sheet specifies that the Absolute Maximum DC current between Vcc and GND is 200.0mA. Since the AVR core and periphrasis such as the UART/SPI/ADC draw some current of their own, we clearly can't control a huge number of LEDs this way. Also note that if we leave the LEDs on for a long time, you'll probably notice the AVR getting a bit warm sourcing that much current.
Next Up: Pull-Up Resistors (and Why You Need Them)
Tuesday, June 22, 2010
Another Day of Printing (and Issy Building)
I got another day of solid printing out of the Makerbot. Finished printing Issy's legs, printed his head camera mount, and the first segment of the tail. The head camera mount is a fairly massive print, at 3.5" x 1.75" and an inch tall. The first attempt warped massively after the first 3 layers and had to be tossed. I got a much better raft on the second one, and it came out fine (some warpage, but not enough to ruin the print). I'm hoping to crank out the snout and second tail section tomorrow.
Unfortunately, no pictures. My camera is on vacation in Florida. But, here's a rendering of the final head/snout with the MS Lifecam cameras:

Unfortunately, no pictures. My camera is on vacation in Florida. But, here's a rendering of the final head/snout with the MS Lifecam cameras:

Sunday, June 13, 2010
Printing Grippers
The Makerbot has gotten a decent workout this past week, printing legs for Issy and (among other parts) a gripper for an upcoming bot. The third time really is the charm: with all the designs for this gripper and Issy's legs, the third design was the one I stuck with. Here's some pics of the aforementioned HS-55 based grippers I'm creating for a 2011 robowaiter entry:


Each gripper has two printed parts: the HS-55 mount and the C-bracket. The servo mount is the same part for both the left and right sides but I had to slightly tailor the C-brackets to get decent range of motion. Each HS-55 mounts to an AX-12 C-bracket.
The gripper fingers are made of 1/16" thick 5052, about 3/4" wide, mounted with two 2mm screws. Instead of a bearing, I'm using a 3/16" Chicago bolt on the non-driven end of the printed C-bracket. Preliminary tests show the grippers have no problem holding the robowaiter plate.
-Fergs
Thursday, June 10, 2010
Issy's New Legs
One of the key features desired for Issy3 is a set of feet with tactile feedback. I've played with FSR versions in the past, and they tend not to survive that long.
Two afternoons of prototyping and printing has yielded the first of Issy's new feet. I have one leg assembled, but I'll still have to get some different hardware tomorrow to tweak it completely.
The foot consists of three printed parts: the outer case, the foot pad, and a retainer insert inside the case. A screw connects throw the foot pad and the retainer, and a spring pushes the foot downward. There will be a little spring steel connector on top that will get touched by the screw -- acting as a simple switch. A vinyl footpad gives traction.
Each foot takes about an hour of printing on the Makerbot.
-Fergs


Thursday, May 20, 2010
Robogames Wrap-Up
Well, it's almost a month since Robogames, but it's been hectic with the end of the semester. The semester is now over though, so it's robot time again.
Issy did terrible in Mech Warfare. He walked like a champ, but had numerous other issues. On Friday afternoon his gun literally exploded inside. Thankfully, I found a Sports Authority around the corner and purchased an extra gun(have I mentioned how much more convienient of a venue San Mateo is over the old place?). Apparently though the Trendnet camera decided that 6V was just too much - it stopped working on Saturday, and Issy was dunn for. He's already been torn down, and retired from Mech Warfare.

He'll be rebuilt over the course of the next month or so, this time with a Fit-PC2, stereo camera head, and a tail. He's going to be running ROS, which ought to be cool. Here's a teaser shot of what he will (hopefully) look like:
On other fronts, I'll be posting some other robot goodies over the coming days. I'm currently working on some finishing software touches for our first "social" robot at Albany, Nelson. I'm also working on a robowaiter entry for next April.
-Fergs
Friday, April 9, 2010
Announcing the RX Bridge
 Our friend Andrew Alter, over at Trossen Robotics, has a bit of a servo fetish. He's the kind of guy for whom AX-12+ servos are just not enough -- he has to have RX-28s and RX-64s -- he recently even upgraded a number of his servos to the EX-106+ (you can read more about his robot Giger over here). Anyways, Andrew wanted to control some RX servos with his ArbotiX, and made that fact well known.
It's often said that "you can't eat your cake and have it too" -- but we at Vanadium Labs don't like idioms, because if we use them, our robots will too. What could be more annoying than a robot telling you "There is no free lunch"? So, we decided that the ArbotiX had to now control RX servos -- and that's exactly what our new RX-bridge can do! This little board plugs into your ArbotiX, transforming it into the lowest cost RX controller on the market -- and you can still use your favorite apps like PyPose/NUKE and the familiar Arduino IDE.
-Fergs
P.S. You can see it all in action on Andrew's RX-64 based quadruped -- powered by NUKE:
Sunday, March 14, 2010
Vacuum Former Finished
 I've been working on building a vacuum former, on and off, since about November. Prior to today, it was still just a pile of parts -- it's now operational.
The former is build out of Home Depot aluminum, a cookie sheet with holes drilled in it, a portable grill/crockpot thingy, and massive shop vac.
It's pretty much a monstrosity. I tried to keep it small, by reducing the height of the lower box, but then ended up finding out I didn't have enough space to get the vacuum tube to turn... I then found these great adjustable legs, from a commercial range, they brought up the height a bunch, and made it easy to plug the tube in. They also add a bunch of weight to the bottom, making it quite a bit more stable.
Unfortunately, you'll have to wait a bit longer to see some of the results, as I didn't get around to snapping shots of Nelson's face plate.
-Fergs
Friday, March 12, 2010
SMALdog gets a new (printed!) head!


 I've been slowly getting the Makerbot tuned in, moving to using an SD card made a huge improvement in build quality, and I'm finally comfortable enough with the bot to walk away for a while. So, today I finally printed SMALdog's new head, the largest item I've printed to date, and my first >1h print.
The first one looked great, but about half way through, the pile of ABS got all coiled up, I walked back in to find that the print head and Z-carriage were pulled to the top of the bot, and the ABS was hanging off the side. De-tangle, reset, chop off about 10-20ft of ABS, and tried again. This print took 1h38m.
I then cleaned it up, attached the dual IR sensors, and the AX-12 servo. The 5/8" hole for the sonar sensor needed quite a bit of cleanup, but everything else was nearly perfect. I've now got all the sensors except the IR photodiode mounted, and the head is on SMALdog.
Now, I've got about 4 wks before the fire fighting competition. Hopefully that is enough time to tune his walking gait, load the map following code in, and get everything else working....
-Fergs
Wednesday, February 17, 2010
What's New in the Lab
It's been a busy month, and the lack of updates here is a testament to that. Over the past month, Vanadium has released two new products, and has another on the way. The MINI RoboController has been on shelves for a few weeks at Trossen, and the ArbotiX Commander should be in stock later this week.

We also purchased a MakerBot, which is now up and running. This little guy will be producing robot parts soon, as I have a number of projects on the backlog that I want to get going.
As for that product on the way: how about controlling some RX-64 servos with your ArbotiX? You'll be able to do just that with our new RX-Bridge, a little add-on board for the ArbotiX that converts it from an AX-12 controller, to an RX-series controller (and EX-106's too).
Lastly, we've been hard at working testing, and the V1.1 release of PyPose/NUKE is just around the corner. Should be out very shortly, with a number of improvements and bug-fixes. Unfortunately, mammal-style IK will be held over until v1.2.
-Fergs
Saturday, January 9, 2010
New Products Coming
 There are a few products we've been alluding to over the past few months, and they are about to be released.
The first is the MINI robocontroller. It's a smaller version of the ArbotiX based on the ATmega168 -- so it's completely Arduino compatible. Just like the ArbotiX it has a dual motor driver, XBEE socket, low dropout regulator, and 3-pin headers for I/O. The MINI also a block of 4 I/O ports that can be easily configured to control servos. The only thing it's missing from it's big brother is that it can't control AX-12s, and it has fewer I/O. This is the perfect board for your first rover! The MINI has had serious testing, an earlier revision was used as the scoring transponder for Mech Warfare 2009, and the new MINI's will be the scoring transponder for MW2010 and beyond. The MINI is also been the board used in my Introduction to Embedded Computing and Robotics workshop. MINIs will retail for $60, and should be available from Trossen Robotics later this week.
A completely different product is the ArbotiX Commander -- it's an Arduino+XBEE based handheld wireless controller. If you've been using NUKE, you've probably heard of our Commander library and protocol. Being open source, you can hack the Commander to do whatever -- there's a row of female headers along the side of the chip, and a whole slew of extra prototyping area at the top edge. It'll be a bit pricey compared to off-the-shelf controllers like the PS2, but I think the open-source and integrated XBEE make this the perfect controller for advanced roboticists. The Commander will be available later this month!
-Fergs
Sunday, January 3, 2010
Get Your IK On
The Nearly Universal Kinematics Engine (NUKE) is finally out in a first beta. Right now our templates only support 3DOF Lizard-legged 4 and 6 leg robots, however 3DOF Mammal-style leg support isn't far off, and low DOF Biped support is in the works. This is the same system that powered Issy, Roz, and Jeff to take the top 3 spots at CNRG's Walker Challenge. It takes about 20-30 minutes to setup your bot once you get the hang of what's going on.
NUKE is written in Python, and it exports a C/C++ Arduino project that runs on the ArbotiX. NUKE can be downloaded from our Google code site: http://code.google.com/p/arbotix/downloads/list. Documentation is also on that site.
We also have a new google group for support (it's very new, hence the low traffic) http://groups.google.com/group/robocontroller
-Fergs
Subscribe to:
Posts (Atom)