Showing posts with label ROS. Show all posts

Friday, April 10, 2020

Robomagellan Update

This is day 6 of my National Robotics Week blog marathon. See the full set of posts here.

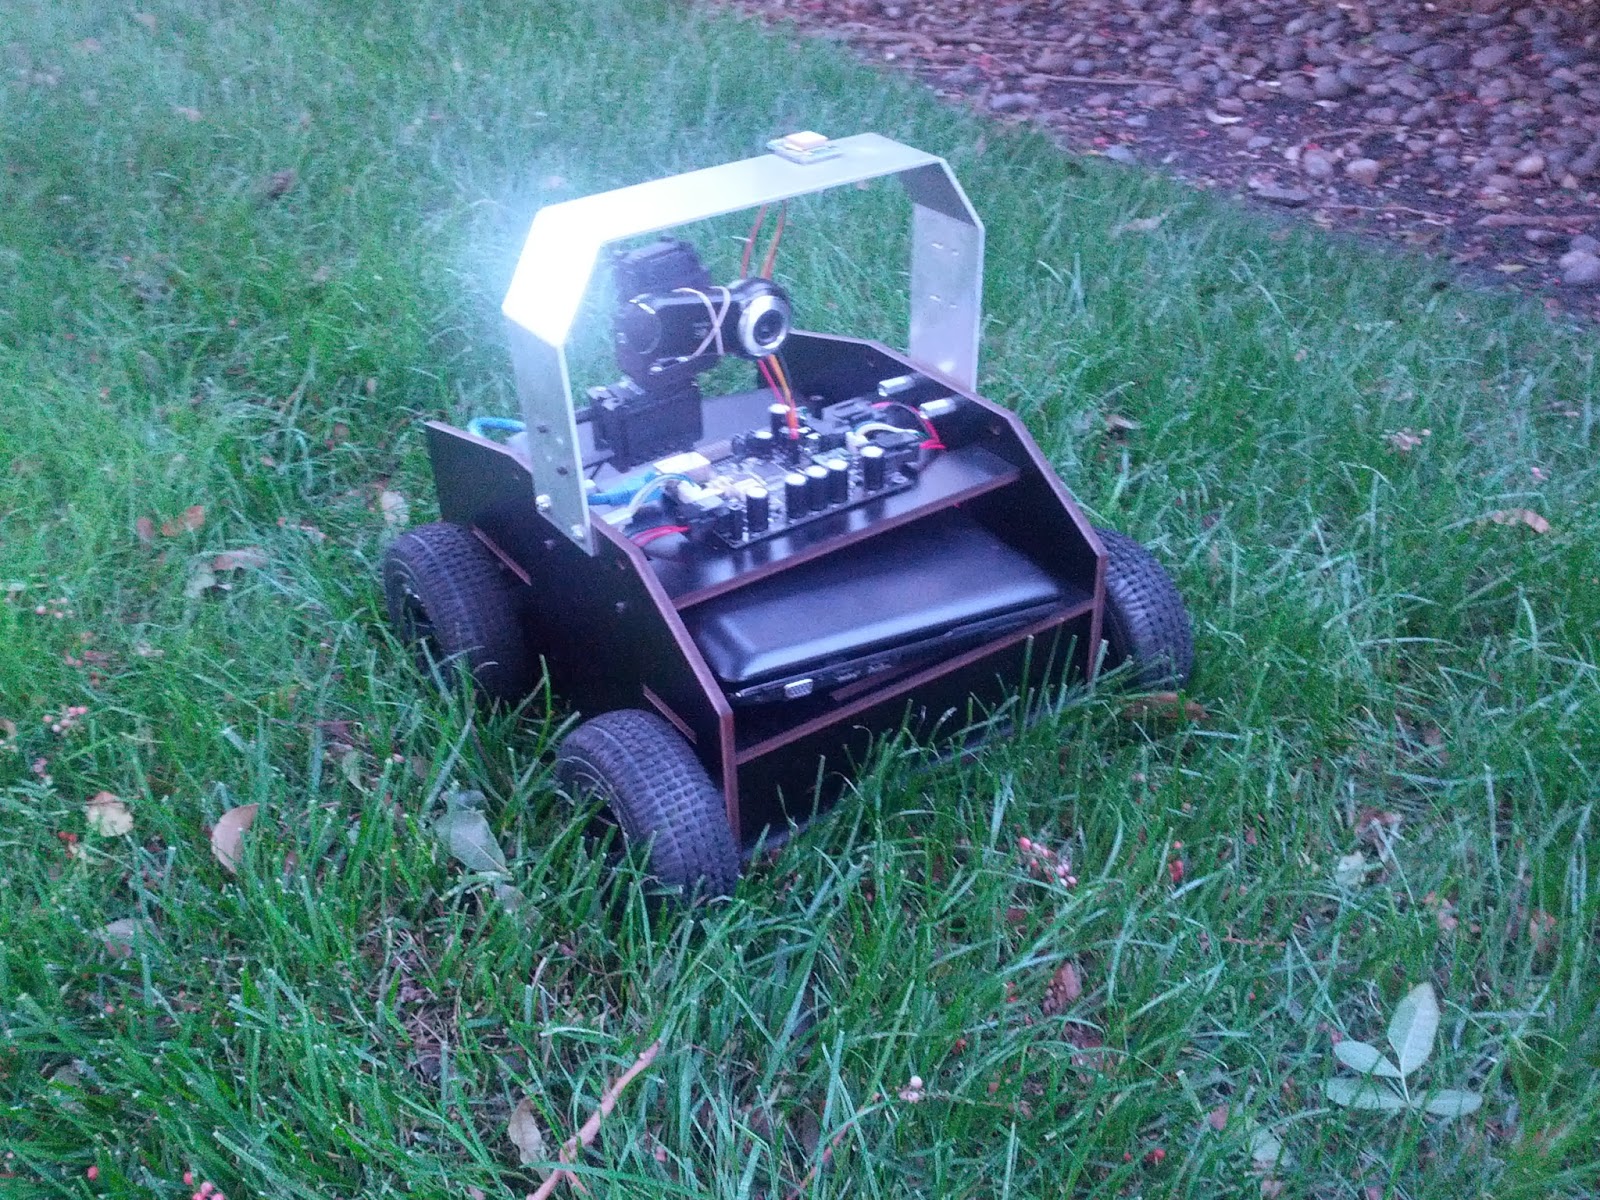
It is really starting to feel like spring here in New Hampshire, so I've been reviving my Robomagellan robot:
The current robot (not shown: Intel D435 sensor)
If you're not familiar with Robomagellan, here is the wikipedia description:
Robomagellan was created by the Seattle Robotics Society and is a small scale autonomous vehicle race in which robots navigate between predefined start and finish points. The start and finish points are usually represented as GPS coordinates and marked by orange traffic cones. In most versions of the competition there are also optional waypoints that the robot can navigate to in order to earn bonus points. The race is usually conducted on mixed pedestrian terrain which can include obstacles such as park benches, curbs, trees, bushes, hills, people, etc..
Unfortunately, there are not many Robomagellan contests happening anymore - but this platform is still good for me to work on some outdoor navigation. I actually started building this robot in 2012 when Robomagellan was quite popular. The robot was briefly worked on in 2014 and 2018. The GitHub contributions view seems to tell this story quite well:

Contribution timeline for Robomagellan
As with any robot that has been developed sporadically over close to a decade, it has gone through quite a bit of evolution. You can find some of that evolution in the posts tagged robomagellan, but  here is a summary:
  • The computer was originally a Turtlebot laptop. It has since been swapped out for an Intel NUC. I've previously posted about how I power the NUC off a 12->19V step up.
  • The original version of the Etherbotix was designed for this robot. It now uses the later Etherbotix design with a plug-in motor driver.
  • The robot now has an Adafruit Ultimate GPS v3. That may change in the near future, as I've been looking at setting up an RTK solution here on the farm.
  • The robot originally used a small chip-level IMU on the Etherbotix, but now uses a UM-7 for better results. That said, I never had any luck with the internal UM-7 EKF (even when trying to calibrate it), so there are probably plenty of cheaper options out there.
  • Originally, the main sensor was going to be a UTM-30 on a tilting servo. I've now simplified that for an Intel D435 depth sensor.
  • The robot is still using the original wheels, however I switched from 100:1 gearboxes to 50:1 to get more speed (the 100:1 were really too torque, the robot literally could climb a wall).
The robot, as you probably guessed, runs ROS. Specifically I'm using the following packages:
  • etherbotix_python - this are my drivers for the Etherbotix board. In addition to controlling the motors and providing odometry, this board also acts as a serial->ethernet adapter for the GPS module. The drivers publish the raw NMEA sentences that are sent by the GPS into ROS.
  • um7 - this is the driver for the UM7 IMU.
  • nmea_navsat_driver - this is used to convert NMEA sentences into a sensor_msgs/NavSatFix message.
  • imu_transformer - is used to translate the IMU position into the base_link frame. My IMU is actually mounted "upside down" so this is super important.
  • imu_filter_madgwick - this is used to track the pose of the IMU. Importantly it fuses the magnetometer information, allowing the IMU to act like a compass for the global EKF.
  • robot_localization - I use two instances of the EKF filter. The first fuses the IMU with the wheel odometry in order to get a good local odometry frame. The second fuses the IMU, wheel odometry and GPS (processed by the navsat_transform_node) into a global odometry.
  • rviz_satellite - not used on the robot, but is an awesome plugin for RVIZ that can download 
Global Localization
Setting up the global localization took me a little while to get working. In order to make this process easier, I setup my main launch file so that I have an "offline_mode" argument which doesn't launch the drivers. Then I have a launch file for recording bagfiles running only the drivers. I can then change everything in my various pipelines when re-running the bagfiles locally. This has been quite useful as I've been tweaking the IMU processing pipeline in parallel with adding the global EKF.

Satellite Imagery in RVIZ
Visualization is always a powerful tool. While RVIZ doesn't have much going for outdoor robots out of the box, the rviz_satellite plugin makes it awesome.

rviz_satellite overlay with some odometry tracks
The one challenging part of rviz_satellite is setting the "Object URI". For an off-road robot, the default OpenStreetMaps don't do much. I ended up using MapBox satellite imagery - but getting the Object URI right took a bit of digging around. It turns out the correct URI is:
https://api.mapbox.com/styles/v1/mapbox/satellite-v9/tiles/256/{z}/{x}/{y}?access_token=XYZ
Also, free accounts with MapBox are limited to 200k tile requests per month. To avoid using these up, you might want to think about running a separate roscore so you can keep RVIZ running even when you restart the robot launch file. That said, I've only used 148 tile requests this month and have been restarting RVIZ quite a bit.

Next Steps
I just recently got the global localization working - I'm probably going to continue to tweak things. The D435 drivers are working pretty reliably now, so the next step is mount the D435 on the robot and start integrating the data and move onto some basic navigation. I also plan to clean up the IMU calibration code I created and get it merged into robot_calibration.

Thursday, April 9, 2020

Robot Calibration for ROS

This is day 5 of my National Robotics Week blog marathon. See the full set of posts here.

Uncalibrated vs. Calibrated


Calibration is an essential step in most robotics applications. Robots have many things that need to be calibrated:
  • Camera intrinsics - basically determining the parameters for the pinhole camera model. On some RGBD (3d) cameras, this also involves estimating other parameters using in their projections. This is usually handled by exporting YAML files that are loaded by the drivers and broadcast on the device's camera_info topic.
  • Camera extrinsics - where the camera is located. This often involves updating the URDF to properly place the camera frame.
  • Joint offsets - small errors in the zero position of a joint can cause huge displacement in where the arm actually ends up. This is usually handled by a "calibration_rising" flag in the URDF.
  • Wheel rollout - for good odometry, you need to know how far you really have travelled. If your wheels wear down over time, that has to be taken into account.
  • Track width - on differential-drive robots, the distance between in your drive wheels is an essential value to know for good odometry when turning.
  • IMU - when fusing wheel-based odometry with a gyro, you want to make sure that the scale of the gyro values is correct. The gyro bias is usually estimated online by the drivers, rather than given a one-time calibration. Magnetometers in an IMU also need to be calibrated.
My robot_calibration package can do all of these except wheel rollout and magnetometer calibration (although the magnetometer calibration will be coming soon).

Evolution of ROS Calibration Packages
There are actually quite a few packages out there for calibrating ROS-based robots. The first package was probably pr2_calibration developed at Willow Garage. While the code inside this package isn't all that well documented, there is a paper describing the details of how it works: Calibrating a multi-arm multi-sensor robot: A Bundle Adjustment Approach.

In basic terms pr2_calibration works by putting checkerboards in the robots grippers, moving the arms and head to a  large number of poses, and then estimating various offsets which minimize the reprojection errors through the two different chains (we can estimate where the checkerboard points are through its connection with the arm versus what the camera sees). Nearly all of the available calibration packages today rely on similar strategies.

One of the earliest robot-agnostic packages would be calibration. One of my last projects at Willow Garage before joining their hardware development team was to make pr2_calibration generic, the result of this effort is the calibration package. The downside of both this package and pr2_calibration is that they are horribly slow. For the PR2, we needed many, many samples - getting all those samples often took 25 minutes or more. The optimizer that ran over the data was also slow - adding another 20 minutes. Sadly, even after 45 minutes, the calibration failed quite often. At the peak of Willow Garage, when we often had 20+ summer interns in addition to our large staff, typically only 2-3 of our 10 robots were calibrated well enough to actually use for grasping.

After Willow Garage,  I tried a new approach using Google's Ceres solver to rebuild a new calibration system. The result was the open source robot_calibration package. This package is used today on the Fetch robot and others.

What robot_calibration Can Do
The robot_calibration package is really intended be an all-inclusive calibration system. Currently, it mainly supports 3d sensors. It does take some time to setup for each robot since the system is so broad - I'm hoping to eventually create a wizard/GUI like the MoveIt Setup Assistant to handle this.

There are two basic steps to calibrating any robot with robot_calibration: first we capture a set of data which mainly includes point clouds from our sensors, joint_states data of our robot pose, and some TF data. Then we do the actual calibration step by running that data through our optimizer to generate corrections to our URDF, and also possibly our camera intrinsics.


One of the major benefits of the system is the reliability and speed. On the Fetch robot, we only needed to capture 100 poses of the arm/head to calibrate the system. This takes only 8 minutes, and the calibration step typically takes less than a minute. One of my interns, Niharika Arora, ran a series of experiments in which we reduce the number of poses down to 25, meaning that capture and calibration took only three minutes - with a less than 1% failure rate. Niharika gave a talk on robot_calibration at ROSCon 2016 and you see the video here. We also put together a paper (that was sadly not accepted to ICRA 2016) which contains more details on those experiments and how the system works [PDF].

In addition to the standard checkerboard targets, robot_calibration also works with LED-based calibration targets. The four LEDs in the gripper flash a pattern allowing the robot to automatically register the location of the gripper:

LED-based calibration target.
One of the coolest features of robot_calibration is that it is very accurate at determining joint zero angles. Because of this, we did not need fancy jigs or precision machined endstops to set the zero positions of the arm. Technicians can just eye the zero angle and then let calibration do the rest.

There is quite a bit of documentation in the README for robot_calibration.

Alternatives
I fully realize that robot_calibration isn't for everyone. If you've got an industrial arm that requires no calibration and just want to align a single sensor to it, there are probably simpler options.

Wednesday, April 8, 2020

Blast From the Past: UBR-1

This is day 4 of my National Robotics Week blog marathon - it's halfway over!

In 2013, Unbounded Robotics was the last spin-off from Willow Garage. Our four person team set out to build a new robotics platform for the research and development community. The robot would cost a fraction of what the Willow Garage PR2 cost. We did build three robots and demo them at a number of events, but Unbounded eventually ran out of money and was unable to secure further funding. In the summer of 2014 the company shut down.

I wasn't really blogging during this whole time because I was really busy when things were going well, and then I didn't really want to talk about it while things were going downhill. The whole affair is now quite a few years ago, so here we go. First, a picture of our little robot friend:
UBR-1 by Unbounded Robotics
UBR-1 Mechanical
The robot had a differential drive base, since that is really the only cost-effective style of robot base out there. It used an interesting 10:1 worm-gear brushless motor, similar to what had been in the PlatformBot our team had previously designed at Willow Garage. The brushless motors were really quite efficient and the whole drive was super quiet, but the worm gear was terribly inefficient (more on that below). The base was about 20" in diameter - which made the robot much more maneuverable than the 26" square footprint of the PR2, even though PR2 had holonomic drive.

The 7-DOF arm had similar kinematics to the PR2 robot, but tossed the counterbalancing for simplicity, lower cost and weight reduction. A parallel jaw gripper replaced the very complex gripper used in the PR2. A torso lift motor allowed the robot to remain quite short during navigation but rise to interact with items at table height - it was a little short for typical counter-top heights but still had a decent workspace if the items weren't too far back on the countertop.

One of the first demos I set up on the UBR-1 was my chess playing demo:


UBR-1 Software
As with everything that came out of Willow Garage, UBR-1 used the Robot Operating System (ROS). You can still download the preview repository for the UBR-1 which included simulation with navigation and grasping demos. As with the ROS legacy of Willow Garage, the open source software released by Unbounded Robotics continues to live on to this day. My simple_grasping package is an improved and robot-agnostic version of some of the grasping demos we created at Unbounded (which were actually based on some of my earlier grasping demos created for my Maxwell robot). A number of improvements and bug fixes for ROS Navigation and other packages also came out during this time since I  was a primary maintainer of these packages in the dark days following Willow's demise.
UBR-1 in Gazebo Simulation
Power Usage and Battery Life
Power usage reductions and battery life increases were some of the biggest improvements in the UBR-1 versus the PR2. The PR2 was designed in 2010 and used two computers, each with 24Gb of RAM and 2 quad-core Intel L5520 Nehalem processors. The Nehalem was the first generation of Intel Core processors. The PR2 batteries were specified to have 1.3kWh of stored energy, but only gave about two hours of runtime, regardless of whether the robot was even doing anything with the motors. There were other culprits besides the computers, in particular, the 33 motor controller boards each had two ethernet PHYs accounting about 60W of power draw. But the computers were the main power draw. This was made worse by the computers being powered by isolated DC-DC converters that were only about 70% efficient.

The UBR-1 arm.
The UBR-1 used a 4th generation Intel Core processor. The gains in just four years were quite impressive: the computer drew only 30-35W of power, but we were able to run similar demos of navigation and manipulation that ran on the PR2. Based on the Intel documentation, a large part of that was the 75% power reduction for the same performance from the first to fourth generation chips. A smaller contributor was improvements in the underlying algorithms and code base.

For dynamic movements, the UBR-1 arm was also significantly more power efficient than the PR2, since it weighed less than half as much. Gravity compensation of the 25 lb arm required only about 15W in the worst configurations - this could have been lowered with higher gearing, but would have had adverse effects on the efficiency when moving and might have jeopardized the back-drivability.

The base motors were still highly inefficient - UBR-1 needed about 250W to drive around on carpet. Hub motors have become pretty common in the years since and can improve the efficiency of the drivetrain from a measly 35% to upwards of 85%.

Robot Evolution
Processors have gotten more efficient in the years since UBR-1 - but their prices have pretty much stopped dropping. Motors haven't really gotten any cheaper since the days of the PR2, although the controls have gotten more sophisticated. Sensors also really haven't gotten much cheaper or better since the introduction of the Microsoft Kinect. While there has been a lot of money flowing into robotics over the past decade, we haven't seen the predicted massive uptake in robots. Why is that?

One of my theories around robotics is that we go through a repeated cycle of "hardware limited" and "software limited" phases. A hardware innovation allows an increased capability and it takes some time for the software to catch up. At some point the software innovation has increased to a point where the hardware is now the limiting factor. New hardware innovations come out to address this, and the process repeats.

Before ROS, we were definitely software-limited. There were a number of fairly mechanically sophisticated robots in research labs all over the planet, but there were not widely-accepted common frameworks with which to share software. PhD students would re-invent the wheel for the first several years of their work before contributing something new, but then have no way to pass that new innovative code on. ROS changed this significantly.

On the hardware side, there were very few common platforms before the PR2. Even the Mobile Robots Pioneer wasn't exactly a "common platform" because everyone installed different sensors on them, so code wasn't very portable. The introduction of PR2 going to a number of top universities, combined with the Willow Garage intern program, really kickstarted the use of a common platform. The introduction of the Microsoft Kinect and the advent of low-cost depth sensors also triggered a huge leap forward in robot capability. I found it amusing at the time to see the several thousand dollar stereo camera suite on the PR2 pretty much replaced (and outperformed) by a single $150 Kinect.

For a few years there was a huge explosion in the software being passed around, and then we were hardware-limited again because the PR2 was too expensive for wide adoption. While the UBR-1 never got to fill that void, there are now a number of lower-cost platforms available with pretty solid capabilities. We're back to software-limited.

So why are robots still software limited? The world is a challenging environment. The open source robotics community has made great strides in motion planning, motor control, and navigation. But perception is still really hard. Today we're mainly seeing commercially deployed robots making inroads in industries where the environment is pretty well defined - warehouses and office spaces, for instance. In these environments we can generally get away with just knowing that an "obstacle" is somewhere - our robot doesn't really care what the obstacle is. We've got pretty good sensors - although they're still a little pricey - but we generally lack the software to really leverage them. Even in the ROS ecosystem, there's huge amounts of hardware drivers and motion planning software (ROS Navigation, MoveIt, OMPL, SBPL, the list goes on), but very little perception code. Perception is still very dependent on the exact task you're doing, there just isn't a lot of "generic" perception out there.

There is a certain magic in finding applications where robots can offer enough value to the customer at the right price point. Today, those tend to be applications where the robot needs limited understanding of the environment. I look forward to what the applications of tomorrow might be.

Tuesday, April 7, 2020

Code Coverage for ROS

This is day 3 of my 2020 National Robotics Week blog marathon!

About two years ago I created a little package called code_coverage. This package is a bit of CMake which makes it easier to run coverage testing on your ROS packages. Initially it only supported C++, but recently it has been expanded to cover Python code as well.

What is Code Coverage?
Before I get into how to use the code_coverage package, let's discuss what coverage testing is all about. We all know it is important to have tests for your code so that it does not break as you implement new features and inevitably refactor code. Coverage testing tells you what parts of your code your tests actually test. This can help you find branch paths or even entire modules of the code that are not properly tested. It can also help you know if new code is actually getting tested.

The output of a coverage test is generally some really nice webpages that show you line-by-line what code is getting executed during the test:

Using code_coverage for C++
We will start by discussing the usage of code_coverage with C++ code first, because it is actually quite a bit simpler. C++ coverage can be done almost entirely in CMake.

First, update your package.xml to have a "test_depend" on "code_coverage" package.

Next, we need to update two places in the CMakeLists.txt file. The first change should be right after you call to catkin_package. The second change is where you define your test targets. You need to define a new target, which we will typically call {package_name}_coverage_report:

That's the configuration needed. Now we can compile the code (with coverage turned on) and run the coverage report (which in turn will run the tests):
catkin_make -DENABLE_COVERAGE_TESTING=ON -DCMAKE_BUILD_TYPE=Debug PACKAGE_NAME_coverage_report
You can find these same instructions (and how to use catkin tools) in the code_coverage README.

Using code_coverage for Python
Python unit tests will automatically get coverage turned on just with the CMake configuration shown above, but Python-based rostests (those that are launched in a launch file) need some extra configuration.

First, we need to turn on coverage testing in each node using the launch-prefix. You can decide on a node-by-node basis which nodes should actually generate coverage information:

Then we turn on coverage by adding the argument in our CMakeLists.txt:
add_rostest(example_rostest.test ARGS coverage:=ENABLE_COVERAGE_TESTING)
You can find this full Python example from my co-worker Survy Vaish on GitHub.

Using codecov.io For Visualization
codecov.io is a cloud-based solution for visualizing the output of your coverage testing. It can combine all of the reports from individual packages, as well as the C++ and Python reports into some nice graphs and track results over multiple commits:
codecov.io dashboard for robot_calibration
A Full Working Example
The robot_calibration package use code_coverage, codecov.io, and Travis-CI to run code coverage testing on every pull request and commit to master branch. It uses the popular industrial-ci package as the base line and then the following changes are made:
  • I set the CMAKE_ARGS in the travis.yml so that coverage is turned on, and the build type is debug.
  • I created a .coverage.sh script which runs as the AFTER_SCRIPT in Industrial-CI. This script runs the coverage report target and then calls the codecov.io bash uploader.
  • Since Industrial-CI runs in a docker, I introduced a .codecov.sh script which exports the required environment variables into the docker. This uses the env script from codecov.io.

Sunday, April 5, 2020

PS4 Controller and ROS

It's National Robotics Week! But you should definitely #StayAtHome, so there are no in-person events this week. I already had this (and several other posts) nearly done, so I'm aiming to post something every day this week.

Recently I updated Maxwell to use the PS4 controller. It is not the easiest thing to setup, and I found lots of misinformation out there that either never worked, or no longer works. So here is how I now setup PS4 controllers on Ubuntu Bionic (18.04).

These instructions require no special packages to be installed, we're using the default bluetooth built into the Linux kernel, which should also mean that other bluetooth stuff continues to work (unlike the older ps3_joy ROS package).

To pair the PS4 controller with the robot computer we need to start the controller in "pairing mode". Hold down the SHARE button while pushing the POWER button. Continue to hold both buttons until the LED starts flashing very quickly.

On the computer we will use bluetoothctl to do three things:
  • Turn on the scan - so we can find new devices. This is how we find the MAC address of the wireless controller.
  • Tell the bluetooth controller to trust the wireless controller
  • Tell the bluetooth controller to pair with the wireless controller
Open a terminal on the robot computer and run the following commands that are in RED. Replace the MAC address with the actual device found (I've highlighted in green what the line should look like):

$ sudo bluetoothctl
[NEW] Controller A0:A4:C5:CC:D1:92 velocityXYZ [default]
Agent registered
[bluetooth]# scan on
Discovery started
[CHG] Controller A0:A4:C5:CC:D1:92 Discovering: yes
[NEW] Device A4:AE:11:02:78:BC Wireless Controller
[bluetooth]# trust A4:AE:11:02:78:BC
Changing A4:AE:11:02:78:BC trust succeeded
[bluetooth]# pair A4:AE:11:02:78:BC
Attempting to pair with A4:AE:11:02:78:BC
[CHG] Device A4:AE:11:02:78:BC Connected: yes
[CHG] Device A4:AE:11:02:78:BC UUIDs: 00001124-0000-1000-8000-00805f9b34fb
[CHG] Device A4:AE:11:02:78:BC UUIDs: 00001200-0000-1000-8000-00805f9b34fb
[CHG] Device A4:AE:11:02:78:BC ServicesResolved: yes
[CHG] Device A4:AE:11:02:78:BC Paired: yes
Pairing successful
[bluetooth]# exit

When complete, the PS4 LED should go solid and turn a deeper blue color. You should only have to do this once, and the controller will remain paired until you pair it with another computer.

Once you've got the PS4 controller paired, you'll find out the button mapping is just a little different form the PS3:
  • The common "deadman" button on the upper corner of the joystick (labeled "L1") is index 4 instead of 10.
  • The joystick axis have changed a bit, I had to change axis_linear from 4 to 3.
  • It is probably a good idea to set the autorepeat_rate on the joy node. This prevents stuttering publishing (and movement).
Here's the changes I made to Maxwell to update from the PS3 to the PS4 controller. I use a custom node for converting Joy messages into Twist messages. If you're using the popular teleop_twist_joy package, you'll be using enable_button parameter instead of axis_deadman.

Wednesday, April 1, 2020

Reviving Maxwell (and this blog)


It has been over 5 years since I last posted on this blog - but now seems like a great time to start posting things again!

We will start with an update on Maxwell, my longest running robot, which originally started as my Masters project at SUNY Albany. He's 9 years old now, although the only original parts are the laser cut base, the drive motors, drive wheels, and the the neck:


I don't expect there are many hobby robots out there with such a long lifespan. Here is a summary of Maxwell's evolution:

  • January 2011 - Maxwell is created with an Arbotix, a series of EX-106 and RX-64 servos, Hokuyo URG-04LX-UG01 laser, a Kinect, and a massive Dell laptop.
  • March 2011 - Maxwell gets an Emergency Stop.
  • August 2011 - Maxwell wins the AAAI Small Scale Manipulation Challenge.
  • December 2011 - Maxwell gets a vertical lift so he can reach the ground and the table. Around the same time, the camera got upgraded to an Asus Xtion.
  • Summer 2012 - Maxwell gets upgraded to a MX series servos. I also wrote a three part article about this in SERVO magazine.
  • Summer 2013 - Maxwell gets upgraded to use MoveIt.
  • Fall 2014 - Maxwell gets upgraded to and Intel NUC and the Etherbotix controller, an ARM-based, Ethernet-connected replacement for the ArbotiX I was originally using. I also created lots of documentation so that Alan Downing from HBRC could build a Maxwell clone (ROSwell)
  • Spring 2018 - Maxwell gets a parallel-jaw gripper (more on this below).
  • Spring 2020 - lots of updates.
The first of the new updates is migrating Maxwell to ROS Melodic. The drivers are all updated, and all the warnings have been fixed. I've built a map of the house here in NH (and fixed a major bug in slam_karto in the process):


I've also updated Maxwell to the PS4 controller, since the PS3 doesn't work so great in newer versions of Linux (this will be the subject of a later post).

While the parallel-jaw gripper was physically installed on Maxwell some time ago, and the URDF had been updated, I never actually finished the software to control the gripper -- that's the project for later this week. In the meantime, here are some close up shots of the gripper:


Sunday, September 21, 2014

answers.ros.org: A Quick How-To

Below are 5 steps to getting the most out of ROS Answers, and hopefully giving the most back to the community in the process:

1. Don't be afraid to ask a question

The name of the site may be "ROS Answers", but there is no point in having answers if there are not questions. Often I find that people comment on old questions, or post answers to old questions, hoping to get help for a possibly related problem. Your comments will probably be missed by anyone who did not previously participate in that question/answer thread, and posting an answer with a question is just bad etiquette. If you have a question, open a new question!

2. But before you ask a question, check to see if someone has already asked and answered the exact same thing!

There are over 15,000 18000* questions on ROS Answers. There is a good chance that if you have a common problem, it has already been asked, and probably answered. The average time between posting a question and getting answer is probably several hours, however, if you spend just a few minutes searching the site you might find your answer immediately.

3. If you ask a question -- try to make sure other people will be able to find it some day by adding appropriate tags.

That search thingy in #2 depends on questions being properly tagged. Adding a few (useful) tags will both help get you an answer faster, as well as making sure that the next person with the same question can find your question and the answer to it. "ros" is probably not a useful tag, the name of the package, node, or command in question would be good tags. Including tags for the specific hardware you might be using could also be useful (for instance "kinect" or "pr2")

4. Close button is evil. Karma is good.

This is probably the most misunderstood aspect of ROS Answers. People frequently post a comment saying "thanks, that works" and then click the "close" button on the question instead of selecting an answer. Please don't do this! Instead, click the checkmark next to the question to select the answer to your question. You can only select the answer on questions that you asked, however, if you find an answer to someone else's question that helps you, you can give a little Karma by clicking the "up arrow". The answer to the right here has been upvoted 26 times -- it must be pretty good.

The answers website really depends on Karma. New users have restrictions (unable to post links, images, etc).  New users NEED Karma to become more effective users. Power users need Karma to be able to moderate the site, like retagging those questions where people didn't get the tags right.

5. Finally, make sure somebody can actually maybe answer your question.

Good answers require good questions. If you get an error in the console, certainly include that exact error into the question. A summary of the error, or "I got an error" are not substitutes for the actual error or traceback. Tells us exactly what commands you ran. Other things you probably want to include: what ROS version, operating system, and robot you are running -- and if you aren't running from up-to-date debs from the OSRF apt repo, you probably want to point out how you installed ROS.

* I started writing this post a few days after the 15000th question was posted. I finished writing it 3000 questions later....

Saturday, September 6, 2014

Intel NUC for ROS

This post has been a long time coming -- I think I promised it to several HBRC members at the July SIG...

I've frequently been asked "what computer do you use on your robots?", usually from someone looking at a variety of sub-$100 ARM boards. ARM processors have come a long way, but for a ROS computer, they are not the easiest choice. Austin Hendrix has done a lot of work to get a buildfarm up and running for ARM processors -- but there is still a long way to go and many things will not work "out-of-the-box".
So my choice? Well, it's not under $100, but it is a very fast, fairly low power machine (here, I define low-power in the sub-15W range). The latest generation of Intel NUC (Next Unit of Computing) modules offer quite a few options for small Intel Core-based computers. I'm using the 4th-generation i3-based D34010WYK. This offers quite a bit of compute power for ROS, especially when you consider that early TurtleBots ran on a single-core Atom. I've used 35W TDP i3 processors on a number of mobile manipulation problems and been able to run the OpenNI/OpenNI2-based drivers, the navigation stack and MoveIt! without much difficulty. If you're looking for a bit more processor, there is an i5-based version for $100 more.
Intel NUC (image from Intel NUC website)
These computers are sold as either a board (somewhat hard to find for sale) or as a kit which includes the case. Either option requires memory, hard drive and wifi card to be added. My setup is:
  • 8GB Crucial Ballistix Sport SODIMM. Whatever you choose, be sure it is 1.35V RAM -- the newer NUC models work ONLY with 1.35V RAM (many modules are 1.5V).
  • 120GB Crucial mSATA SSD. Intel offers a larger case version of the NUC that fits a standard 2.5" drive, but the smaller versions only take an mSATA drive.
  • Intel 7260 Wireless-AC Card. This card will work best with Ubuntu 14.04, older versions will need an updated kernel (at least 3.13) to get working drivers. No need for antennas as they are already in the case.
These boards take 12-24V DC input, but are probably most efficient at 19V. I'm powering mine off a 12V battery connected to a Pololu 5A Step-Up Regulator that is configured to output the desired 19V. My batteries will never get even close to 19V even when fully charged, and so the regulator should not have any issues.
I would recommend installing Ubuntu 14.04 and using ROS Indigo for these machines. If you want to use an older Ubuntu distro, you should definitely make sure your wifi card is compatible, because the Ethernet port will not work with the drivers present on the 12.04 installer and you will have to connect to ubuntu.com to update somehow. Another alternative is to look for a NUC based on the 3rd-generation Intel Core processors, but these might be hard to locate.

Sunday, February 23, 2014

It's actually alive!

Over a year ago, I posted about my RoboMagellan robot, and then nothing. It's been pretty busy for the past year, but I finally got back to working on this robot. The control board is now mostly functional, and I have integrated the IMU and GPS. I still have to get the tilting laser assembly mounted and working, and come up with a permanent mount for the camera, but earlier today I finally field tested the robot:


Drives well in grass, on pavement, and even has enough gusto to get up onto concrete parking lot wheel stops (although it tends to then get stuck on top of said stop). The forward odometry is good, but I still need to tune the turning odometry.

As far as ROS integration goes, I have the IMU, GPS, and wheels tied into ROS. For decoding the GPS I'm using the nmea_navsat_driver package, which made things quite easy. I'm currently working on some tools for handling localization and visualization while in a GPS coordinate frame (more to come on that, but it is developed on top of geodesy). Code for the project is pretty minimal right now, but is hosted at https://github.com/mikeferguson/robomagellan

Sunday, September 29, 2013

Buildbot-ROS

It has been a while since posting, I figured I'd give an update on a project I've been working on recently: a ROS buildfarm using BuildBot.

Of course you are probably thinking, "but ROS already has a buildfarm?" And that is correct, however I found that it was quite hard to setup a personal instance of the Jenkins-based farm that builds ROS Debian packages. There is not all that much documentation, and extending it is not ideal for me as it uses an interesting mix of java-ish stuff.

Enter buildbot. Buildbot is like Jenkins, except completely written in Python, and I like Python. While buildbot doesn't have as many features and plugins as Jenkins, it has more than enough to get the job done. Anyways, I created a buildfarm  using buildbot + catkin, which can do the following:

  • Build Debians, just like on the ROS buildfarm. This includes doing it all in a cowbuilder so you know that the dependencies are right.
  • Build test jobs, similarly to the ROS buildfarm, whenever you push to a repository (only git is supported)
  • Build doc jobs, pretty much like the ROS buildfarm.
  • Build arbitrary source debs into binaries.
The system loads its configuration from a rosdistro file. In addition to loading what to build, I also have it setup to load where to get debs from in the rosdistro, making it easy to change deployment setup.

Buildbot-ROS is still quite early in development, but does most of the things that an individual or small team would need internally. The documentation is in the README, which gets nicely rendered by github. The code can be found on my github account: https://github.com/mikeferguson/buildbot-ros

Tuesday, May 21, 2013

Generating an IKFast Plugin for MoveIt

Over the past few weeks I've been using MoveIt quite a bit -- I was actually using the Pick and Place actions for Maxwell's chess playing last weekend at Maker Faire (an updated on that shortly).

I recently changed over to using IKFast for IK under MoveIt. This fixes a number of problems with the default IK plugin. I'm using ROS Groovy under Ubuntu Precise, and ran into several issues which I thought I would mention here.

First off, I start with the excellent moveit_ikfast_generator from Dave Coleman. You should run his instructions for "Create Collada File for Use with OpenRave". Once you have a collada file, here is what I did to make the ikfast generator work:

      sudo apt-add-repository ppa:openrave/release
      sudo apt-get update
      sudo apt-get install openrave0.8-dp-ikfast

At this point, I had to edit a /usr/lib/python2.7/dist-packages/openravepy/__init__.py to add the following line just after the copyright:

      __openravepy_version__ = "0.8"

Without this, nothing seems to run. Once the code is updated, the tools listed in section 5 of the ROS Industrial tutorial work as indicated.

Then it's back to the README in moveit_ikfast_generator, where the instructions will walk you through generating the ikfast plugin. One note there is also a command for:

    openrave-robot.py my_robot.dae --info joints

which is very helpful if you have a 7-dof actuator and need to fill in the --freeindex parameter.

I'd like to take one quick moment to thank Dave and the ROS Industrial team for their documentation, and Ioan Sucan and the rest of the MoveIt team for the great platform they've provided.

Tuesday, April 30, 2013

Blast from the Past: PR-MINI

I was recently updating my personal website when I realized that I had some projects that had never seen the light of day. This post is about one of these old projects that I never showed off:


Back in late summer of 2010 I started to build a miniature PR2. It was a 60% scale model of the PR2 arms, base, and torso. The base was differential drive instead of the more expensive casters found in the PR2. I reused the motors and 6" wheels that had previously been used in REX, one of my first large robots. For this robot, the frame was primarily 8020 Aluminum rail covered/connected with laser-cut ABS and the occasional sheet metal bracket:


The head sported a pan/tilt, which used two AX-12s for tilting and a third for pan. It had two webcams for stereo, and was designed with enough space between the web cams to install a Videre short-range stereo camera, although I never got around to that:


The arms were pretty massive, nearly 0.6 meters long, with 7 servos. The shoulder pan, forearm roll, wrist pitch and wrist roll joints were AX-12s. The shoulder lift joint was an RX-64, while the elbow and upper arm roll joints were powered by (admittedly, under-powered) RX-24F servos:


The torso had a 12" throw linear actuator, and used expensive and heavy 8020 parts to form the bearings and rail:

The entire thing was controlled by a laptop, tucked into the base, and an ArbotiX prototype with integrated motor drivers. When dealing with robots this big and heavy, an E-stop is a must. The wiring on the back panel was made somewhat tidy, and covered with Lexan shells:


I went as far as moving arms around under ROS, and tuning in the navigation stack a bit. The code developed for this robot later became the arbotix_ros drivers:


A couple of things did this robot in. First off, it was really heavy (45lbs) and hard to easily transport around (which I was doing a lot of back then). Transport was quite funny as well, because the arms loved to dangle in every possible direction, leading to the "bubble-wrap straight jacket":


Second, the Kinect came out shortly afterwards, making the sensor suite pretty lacking, and looked ludicrous trying to strap a Kinect on this robot. A number of lessons learned are pretty clear in Maxwell, which was built shortly after this robot sacrificed his arms. Oh, and since I couldn't find a reason to slip this picture into the story above, here is a view of the Autodesk Inventor CAD model:

Monday, April 29, 2013

PR-Shelf

PR-Shelf, the most awesome, not-actually ROS-powered, robot shelf:

Monday, April 8, 2013

National Robotics Week (and a quick note on MakerFaire)

It's National Robotics Week! And apparently, there is just TOO MUCH ROBOTICS for just one standard week, because NRW spans 9 days, and the website lists events pretty much all month.

There are a number of events in the Bay Area. First up is the Robot Block Party at Stanford from 1-6PM on Wednesday -- there are usually a ton of bots around in a somewhat impromptu show and tell. While I don't think I'll be pulling Maxwell out for this event, I'll probably be there for the later part of the event. Oh, and it's FREE.

Also this week is an interesting event by on Thursday at SRI, put on by Xconomy: Robots Remake the Workplace. Including a keynotes speech from Rodney Brooks.

April 19-21, it's RoboGames! Maxwell will be making an appearance there for sure, likely in the Silicon Valley HomeBrew Robotics Club booth.

And finally, Maxwell will battle PR-Lite at MakerFaire 2013. In chess, that is. That's right, I've dusted off the old AAAI Chess code and the PR-Lite guys have been working to adapt it to their robot. I actually ran into some major issues upgrading the chess code to Groovy as many of the PCL nodelets were not ported forward during the catkinization. So, I took this as an opportunity to rewrite the whole board/piece detection pipeline into a single node that is way faster than the old one, taking into account a number of better heuristics.


I'm still working to integrate MoveIt instead of arm_navigation, but the current code is posted now on github.

Tuesday, March 19, 2013

Catkin Resources and Common Pitfalls

ROS has recently introduced a new buildsystem, called catkin, which is a replacement for rosbuild. One of the greatest strengths of this new buildsystem is that it is pure CMake, which makes it highly portable, standard, and awesome. However, one of the biggest weakenesses of this new buildsystem is... well, it's entirely CMake, so it is a steep learning curve at times, and easily ridden with bugs.

In typical ROS fashion, there are a number of tutorials on catkin (http://ros.org/wiki/catkin/Tutorials). However, there really is a ton of info that is hard to compress into a small set of tutorials.

The rising tide

You'll often hear the term "wet" and "dry" for catkin versus rosbuild. The important take away here is that it is indeed a rising water level. In other words, "wet" (catkin) packages cannot depend on "dry" stuff. This means you have to wait (or jump in and help) on any rosbuild package that you depend on. The quickest way to see what is catkinized is to look at http://ros.org/debbuild/groovy.html. If it says wet, all good. If something is listed as dry there, it may still be catkinized in preparation for hydro, but only the dry version went into groovy, so check the source repo for a hydro-devel branch or similar.

How is the workflow different?

Catkin moves ROS towards a more standard Filesystem Hierarchy System (FHS) as detailed in REP 122 as well as introducing out-of-source builds and install targets. Understanding this FHS is key to proper catkin package design, especially the install step.

How is a catkin package different from a rosmake one?

In rosmake, we had packages and stacks. In catkin, there are only packages. New catkin packages have a package.xml instead of a manifest.xml and there are a number of changes to the set of available tags. Especially different is that dependencies are all now of one time (no longer are packages/stacks/rosdeps treated differently), but also you specify whether dependencies are needed at build or run time. So what about stacks? Well, they were really nothing more than a nice way to group a series of packages together. In catkin, this is handled by a metapackage. A metapackage has only a package.xml, with rundepends tags for each package in the old stack. Details of catkin's pacakge.xml can be found on http://ros.org/wiki/catkin/package.xml.

In addition to package.xml, CMakeLists.txt still exists, but is basically completely different looking. If you are using Python for anything other than rosrunned-scripts, then you will almost need to create a setup.py. There is a migration guide available on the wiki.

Long Live Roslib. Roslib is dead.

One of the major changes now is that with the new FHS, catkin-based Python scripts no longer need to do a "import roslib; roslib.load_manifest()" as the Python path already includes all your installed catkin-based packages. This also means it's easier to test stuff by starting a Python shell and importing just about anything. Just be sure to include the appropriate setup.bash file to get the paths right.
One potential pitfall of this is that if you used to just throw all your python source into "package_name/src", you'll want to start doing "package_name/src/package_name" instead (and be sure to have an __init__.py file in there). This makes the setup.py script dead simple, and also ensures you get a real "python package" with the same name as your "catkin package".
Further Reading
As with any new system, there are a number of questions that arise which maybe the docs don't fully cover. Here are a couple really good ones from ROS Answers over the last few days:
I plan to keep adding to this list...

Friday, March 15, 2013

Update: ROS on Arduino

It's been about 18 months since ROSserial was first released. Since then, ROS has undergone a number of changes, including a new build system, new message generators, and more. Unfortunately, this massively broke ROSserial.

Over the past few weeks, I've spent a bit of time fixing up ROSserial to use the new ROS build system, catkin. I've updated things so that message generation *mostly* works. I'm sure there are still a number of bugs in there, but it's now mostly working again and has just been released into Groovy as version 0.4.3 (currently on shadow-fixed, should be in the public ROS debian repos in a few days).

Recently, ROSserial has been moved to github like so much of ROS. Across the board, the move to github appears to have greatly increased community participation. Speaking of the ROS community, there is another ROS on Arduino package recently released: ros_arduino_bridge. Patrick Goebel of PiRobot.org and the Homebrew Robotics Club recently released this package which is primarily aimed at controlling a differential drive base. I've frequently heard people ask about running a diff-drive base using ROSserial, but the biggest problem is support for the massive nav_msgs/odometry message. This new package doesn't have the flexibility of ros_arduino_bridge, but definitely gets the job done for a mobile base.

Finally, ArbotiX drivers have had some minor updates and have been moved to catkin, and are released. Version 0.8.1 should be in the next set of public ROS debians.

-Fergs

Monday, February 25, 2013

Move'n'It

I've recently gotten a chance to play with MoveIt -- a new manipulation framework for ROS. MoveIt is the replacement for arm_navigation in ROS Groovy and later. Like arm_navigation, MoveIt allows you to plan, in collision free space, the movement of your robot arm. However, unlike arm_navigation, it was designed from the ground up as a series of C++ libraries, with thin ROS wrappers, meaning it is far more extensible.

In the past, I had wrapped arm_navigation's move_group with the simple_arm_server package, which allows 5-DOF arms, like Maxwell's to work with MoveIt. This time, I've taken the easy way out and just added a 6th degree of freedom, an upper arm roll:


I had one extra MX-64 around, and printed a couple of brackets on a MakerBot Replicator (files are posted on Thingiverse). With this extra servo, all of MoveIt pretty much works out of the box. Once I wanted to control the real robot, I ran into a bit of issue. While I've heard that you can use the PR2 controller manager plugin, I couldn't quite get the settings correct. I therefore created a simpler version, which you can find in Maxwell's github in the simple_moveit_plugins package. Here's a quick shot of RVIZ with the MoveIt plugin:


While MoveIt is still version 0.3.20 something, it's actually pretty awesome.

Saturday, February 16, 2013

3D Mapping is Here

It's just about 2 years since Willow Garage ran the ROS 3D contest to see what the community could come up with for Kinect/OpenNI applications. The full results are here. The winner in the "most useful" category was a 3D SLAM application called RGBDSLAM. I remember trying to get it running, I eventually did, but it was not easy.

Just this past week I saw a post from the guys over at CCNY, showing off their new visual odometry and keyframe (offiline) mapping system. I decided to give it a try... and it worked out of the box no problem. Here's a video CCNY posted:


A few days later I came across a video (and code with ROS wrappers) from IntRoLab at Sherbrooke:


I also have noticed that RGBDSLAM is still getting updates and documentation revisions, so it is still getting active improvements.

I'm thinking it would be really cool to put together an application that turn these 3d maps into 2d maps usable by the ROS navigation stack. Robots like TurtleBot can typically localize against a map with just their Kinect-like sensor, but building maps has traditionally been tough due to the lack of features visible in a 57-degree wide "fake-laserscan".

This is really awesome stuff for the robotics community -- we have at least 3 different 3D mapping applications released into the ROS ecosphere. Are there more out there that anyone knows of? If you've used these apps, feel free to comment!

-Fergs